Tuesday, October 9, 2018

Frame-by-framing in YouTube and Vimeo!

On Vimeo:
Shift + Left Arrow
Shift + Right Arrow

On YouTube:
,
.


Sources:
https://motionarray.com/blog/learn-how-to-go-frame-by-frame-on-a-vimeo-video
https://www.quora.com/How-do-you-watch-YouTube-videos-frame-by-frame

Friday, October 5, 2018

IK FK snapping!

Currently having trouble snapping an IK setup to FK. I'm working with the rigger on this (BIG advantage).

The setup:
IK Animation Controls  are usually offset a bit from the Joint they drive, either in Translation, Rotation, and sometimes both (rare case). This is so that animators have controls that behave appropriately in world-space.

The problem:
Each IK control SHOULD match to the Joint that is being driven, but because of the offset, snapping can be difficult.

The solution:
Get the offset values when the rig is at its default pose during the rig-creation process! This value can be used to snap the Control to the Joint, then Constrained with the recorded offset, baked, and now you have the IK with the exact animation pose as the FK control!

How it works:
When the rigger creates a new Control and places it accordingly in relation to the Joint, there is a value (known by the rigger).

MATH!!!

So, the actual math is a bit beyond me, but the logic is there. The idea is simple.

On the rigging end:
- Get the Joint's world Transformation values, inverse it (JTI)
- Get the Control's world Transformation values (CT)
- Multiply the CT x JTI (the order is important when doing Matrix Math)
- Store the output in the Joint itself as an attribute
Sample code:
stored_values = control.worldMatrix.get() * joint.worldMatrix.get().inverse()
joint.ikOffset.set(str(stored_values))


On the animation tool end:
- Get the current world-location of the Joint (J)
- Get the offset position relative to the Joint, stored in the attribute (O)
- Multiply O x J
- Apply the new world-Transformation (translation, rotation, or both) values to the Control!
Sample code:
matrix_offset = pm.dt.Matrix(list(eval(stored_values_string)))

new_matrix = matrix_offset * joint.worldMatrix.get()
control.setTranslation(new_matrix.translate,space='world')
control.setRotation(new_matrix.rotate,space='world')


Here's what the full code would look like using Pymel!

import pymel.all as pm
joint,control = pm.selected() # Get the Joint and Control

# Multiply the Control's worldMatrix times the Joint's Inverse worldMatrix to get the offset
stored_values = control.worldMatrix.get() * joint.worldMatrix.get().inverse()
joint.ikOffset.set(str(stored_values))

# Store the value on the Joint itself as "ikOffset"
stored_values_string = joint.ikOffset.get() # For this exercise, I'll use the value below instead as an example
stored_values_string = '[[0.279186612049, 0.96009314151, -0.0166131056216, 0.0], [-0.835911951206, 0.251517268104, 0.487842468094, 0.0], [0.472552690695, -0.122311992345, 0.872773585213, 0.0], [-5.74275377315, 1.40332190313e-12, -14.0587247215, 1.0]]'
matrix_offset = pm.dt.Matrix(list(eval(stored_values_string)))

new_matrix = matrix_offset * joint.worldMatrix.get()
control.setTranslation(new_matrix.translate,space='world')
control.setRotation(new_matrix.rotate,space='world')


Sources:
Convert string to list
http://forums.devshed.com/python-programming-11/convert-string-list-71857.html

Math is Linear Algebra. Someone taught me how it works, so I'm still looking for a good tutorial on it!

Friday, September 21, 2018

Need to enable playback on all viewports at the same time?

Go to preferences > Time Slider>Playback and change Update View from Active to All.
Source:
https://forums.cgsociety.org/t/scrub-animation-in-all-viewports/1524209

Wednesday, September 5, 2018

Get distance between two points

Question was simple. Get the world position of any item in space throughout the entire timeline, then compare each point to get the frame-by-frame traveled distance.

With pymel, first get the item:

import pymel.all as pm
item = pm.selected()[0]

Get the frame range and turn off cycle check:

start_time = pm.playbackOptions(q=1,animationStartTime=1)
end_time = pm.playbackOptions(q=1,animationEndTime=1)
anim_range = range(int(start_time),int(end_time))
pm.cycleCheck(evaluation = 0)

Then, get its worldMatrix at every frame:

item_values = [pm.getAttr(item.worldMatrix,time=t)[-1][:-1] for t in anim_range]

To figure out the difference between frames, I didn't know how to do, so after some searching, this post had the most concise result:

https://stackoverflow.com/questions/1401712/how-can-the-euclidean-distance-be-calculated-with-numpy

And finally, the code needed to get the differences

per_frame_change = []
for i in range(len(item_values)-1):
    per_frame_change.append(numpy.linalg.norm(item_values[i] - item_values[i-1]))


Here's the whole code!

import pymel.all as pm
import numpy
start_time = pm.playbackOptions(q=1,animationStartTime=1)
end_time = pm.playbackOptions(q=1,animationEndTime=1)
anim_range = range(int(start_time),int(end_time))
pm.cycleCheck(evaluation = 0)

item = pm.selected()[0]
item_values = [pm.getAttr(item.worldMatrix,time=t)[-1][:-1] for t in anim_range]

per_frame_change = []
for i in range(len(item_values)-1):
    per_frame_change.append(numpy.linalg.norm(item_values[i] - item_values[i-1]))

Tuesday, August 21, 2018

Highlight duplicate inputs in Google Sheets

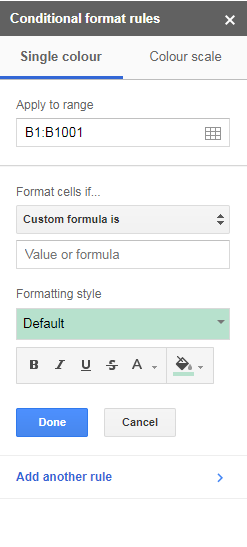
We use Google Sheets to track one-off assignments (shots that need fixing). I realized that some shots were coming in as duplicates, so I found this handy idea to detect duplicate inputs.

https://www.nichemarket.co.za/blog/excel-google-sheets-like-pro/

Here's the snippet from the above link (all credit to the poster):

  1. Select the the whole column or range you would like to dedup.
  2. Frome the menu, select Format >> conditional formatting. The conditionalformating toolbox will open which looks like this:
    conditional-formatting-google-sheets
  3. From the drop down menu under “Format Cell If”, select “Cutsom Formula is” and add the following condition:
    =countif(B:B,B1)>1*
    * Where B is the colum you are trying to dedup.
  4. Choose a formatting style so you can quickly identitfy duplicated cells.
  5. Select Done and you good to go!

Thursday, April 3, 2014

3DS Max CAT Gimbal problem - Solution!

Recently, I've been looking for a way to fix this, and no where did I find a solution... So I analyzed the CAT tools, and finally, I discovered the solution that WORKS!

I will explain the first problem, a simple solution to the first problem, a second MAJOR problem, and a somewhat complex (but built-in to CAT's tools) solution:


Problem 1: A CAT-rigged character with a T-pose in Max will not have a properly working spine control.  Whenever the hips rotate, so does the spine.

Solution 1:

  1. Select the Chest Control
  2. Under Hierarchy>Link Info>Bone Hierarchy>Inheritance>Animation Mode, turn off "Inherit Rotation".  This will allow separate rotation between the hips and spine.


Problem 2: When "Inherit Rotation" is turned off, the rotation tools in the Viewport work perfectly, but once in the Graph Editor, both X and Z rotation are flat on top of each other and must be counter-animated, also known as a Gimbal Lock.

Solution 2:

  1. Select the Chest Control
  2. Hierarchy>Link Info>Bone Hierarchy>Inheritance>Animation Mode
    • Turn ON "Inherit Rotation" (undo what was done in Solution 1).
  3. Hierarchy>Link Info>Inherit>Rotate, turn OFF X, Y, and Z.
  4. Motion>Euler Parameters
    1. Axis Order: YZX
    2. Rotation Axis: Y

If you work a lot using the graph editor, you will immediately notice how much faster your workflow will be.  Enjoy!

Tuesday, November 19, 2013

MatchMoving!!

I've been researching a few techniques to fix my latest render file, so I've resorted to simply re-doing the MatchMoving (the technique to match the camera to a cg environment).  I'm hoping that this helps me with my scene!

This is the tutorial that I found:

I'll upload my findings later :)

Thursday, November 7, 2013

Expanding my creative toolbelt

In the past few years, several well-respected VFX and Animation companies went under.  A few other ones received huge hits in layoffs.  This was an obvious sign of the times of the VFX industry, and I knew that with the ever-growing pool of talented artists, my chance of breaking into the industry was very slim.

I decided to do something about it.

I studied Character Animation, and as much as I love the art-form, I slowly realized (through artists that lost their jobs due to the excess of similar/senior artists that companies had) that applying for work with only that ability would not aide me in the short term, so instead I decided to learn something new, and Animation Mentor was going in a very interesting direction with it.

They introduced their Collaborative Animation Classes, where students work together to make a short film.  A few months later, Bobby Beck (CEO and co-founder of Animation Mentor) announced the VFX Fundamentals Course.  Students would go through learning Autodesk's Maya, SolidAngle's Arnold rendering technology, and The Foundry's Nuke.

This was my chance.  A few months beforehand one of my teachers told me that if I can, find an art-form that will complement what I already know, and Visual Effects seemed ideal.

It has now been almost 10 months since I decided to apply.  And here are my findings:

I love it.

Rendering, figuring out how to use multiple software packages to improve what is given to me, and improving on already-amazing animation is extremely gratifying.  Every time I tweak something, or learn something new, time slows down, and I feel the art-form just taking me in.  It is truly amazing.

With all this, I have decided to start writing on my blog again.  Every minute I spend on this, I discover something new, and when I try it, I discover a new problem that I need to overcome.  The best part is, I don't ever feel bored whenever I encounter something different!  My hands are literally shaking as I write this.  Just thinking about it makes me giddy!

For CG Basics (the first Class), our mentor was Scott Liedtka, a Visual Effects Supervisor at Tippett Studio.  He is an amazing mentor, from whom I learned an amazing amount of information.  He is a great conversationalist, and the way he explains complex concepts is fantastic.  It is obvious that he enjoys talking about the subject, and that is what makes a good teacher in my book.

Now I am in Lighting Basics with Bruce Powell.  He is credited as a CG Sequence Supervisor at ILM, and has worked on Pacific Rim, one of my favorite movies this year.  His eye for detail is really sharp, and every time he points something out, it opens my mind to a new concept.  This has happened many times already, and I'm sure it's not the last.

I hope that this refreshed blog will serve as a good support for anyone interested in the Animation Mentor community.

As Scott Liedtka said to us on our first day of CG Basics, "Do cool shit!"

Wednesday, May 30, 2012

AME: Class 1, Assignment 2: Light vs. Heavy

Assignment 2: One light ball, one heavy ball!


AME: Class 1, Assignment 1: Bouncing Ball

Here's my first animation for my personal competition of: AnimationMentor EXTREME Edition!!

I'll be uploading these onto YouTube as a channel as well!  Enjoy!


Sunday, June 5, 2011

New Reel!

So, ladies and gents, here's my brand new Demo Reel! It's only 2 shots, but I feel they are nice enough to post on my site as finals. Enjoy! :)

Latest Performance Animation Reel from Isai Calderon on Vimeo.

Here's my latest performance animation Reel!

*All rigs provided by Animation Mentor. All animation done by me!

Monday, December 6, 2010

Tuesday, October 19, 2010

New Word of the Day Challenge - Laconic

Turns out I need to practice my facial animation. So, I came up with a very nice idea: Take the Word-of-the-Day from Dictionary.com, and animate Bishop 2.0, from Animation Mentor, saying that word. Yesterday's word was laconic:

–adjective
using few words; expressing much in few words; concise: a laconicreply.

I began this challenge with Martha Murrie, a fellow AMer. Here's my resulting animation for the first WotD Challenge:


And here is Martha's WotD, same word, different acting choice:

Monday, May 10, 2010

Class 3 - Assignment 2 - Intermediate Stewie!

Reference: Heavy Sword from Isai Calderon on Vimeo.

Here's the reference for my next animation. Stewie will be swinging a heavy, two-handed sword. Enjoy!

Class 3 - Session 6 - Intermediate Stewie from Isai Calderon on Vimeo.

Here's my next animation :) This is Stewie in sequence to what happened in the last video. He is now a little stronger, and an enemy appeared. He attacks (kind of)!

Sunday, April 18, 2010

Class 3 - Session 3 - Amateur Stewie!


Amateur Stewie from Isai Calderon on Vimeo.
Sorry I haven't posted anything lately :( Work has me extremely busy, so Blog maintenance has gone down quite a bit.


Here's my newest video. Amateur Stewie! Blocking-Plus stage!

Wednesday, February 10, 2010

Class 2 - Session 5 - Blocking

Class 2 - Session 5 - Blocking from Isai Calderon on Vimeo.

This next animation is of a drunk armless Stewie. In it, he's stumbling to get onto his feet, but fails and falls. Once again, any critique is welcome :) This is the blocking stage.

Monday, January 25, 2010

Class 2 - Session 3 - Polishing

Class 2 - Session 3 - Polishing from Isai Calderon on Vimeo.

This is the Polishing Pass. Here, I've set all the curves into Splines. This means that, different to the last video, instead of looking like it's skipping frames, the character looks like a more smooth animation now. Next up, Refining. Enjoy!

Sunday, January 17, 2010

Class 2 - Session 1 and 2 - Reference and Blocking

Class 2 - Session 1 and 2 - Reference from Isai Calderon on Vimeo.

Here's the reference I'm using for my next assignment. It's start/stop animation with a 360 turn. I will be using this to animate Ballie doing pretty much the same movements, with a few variations.


Class 2 - Session 2 - Ballie 360 from Isai Calderon on Vimeo.

And here's the first pass. The blocking. If you have any critiques to make it better they are all greatly appreciated!

Wednesday, November 11, 2009

Interview animation, 001

Please leave your critiques on this animation below :) Any comment to make this animation better is greatly appreciated.

Thursday, August 27, 2009

RobotArm Animation

Here's the result for my next assignment. Pick up cylinder, and place it somewhere else. This assignment was to learn how to animate in Maya, so it's not officially critiqued. Any comments are welcome :)... If it's a mean one, please make sure to give pointers on how to make it better, not just say it's crap... You get the idea :) No one likes bad critiques... Enjoy!


RobotArm_Anim from Isai Calderon on Vimeo.

Wednesday, August 12, 2009

Maya Update: First Animation

So, we started the animation part of the Maya Springboard program. I had fun animating this first animation for, well, AnimationMentor. But first, an update on my last scene. I think it came out ok :) What do you think?


Monday, August 3, 2009

Maya, here we come!

So, I recently began the Maya Springboard Program; a.k.a. massive Maya learning experience. Here's the resulting product of 1 week of work in Maya. First, I made the character (no joints, bones, or anything technical) out of pure geometry, and I think it came out ok for someone that doesn't do a lot of modeling.

Then came the Scene. Here's some screenshots. I'll be adding a few more things to it every day I learn something new.


Friday, March 27, 2009

Jimbo and Skeeter VS. The Apocalypse

This is a new game featured with the Blade Engine, previewed at GDC '09. I made several animations in the game. Here are a few of two of all the enemies: The Hellhound, and the Chicken Mech (I know it doesn't look like a chicken, but it's supposed to act like one. The game is called Jimbo and Skeeter vs. The Apocalypse, which is still in Beta, and the company I worked with is Gaslight Studios.


Jimbo and Skeeter VS. The Apocalypse from Isai Calderon on Vimeo.

Thursday, March 19, 2009

Animation Demo Reel

Ladies and gentlemen. I give you the mighty Animation Demo Reel. I hope you all like it :)


Animation Demo Reel (Updated) from Isai Calderon on Vimeo.

Also, as you can tell, I've decided to redesign my website a little for better viewing. Enjoy the show! :)

Tuesday, February 24, 2009

Preview of the final product


Here it is, ladies and gentlemen, a picture of what OliveMan will look like in my reel. I am now working on it, polishing up the animations I'm most proud of, and putting them together to create my final Demo Reel. I'm not going to post any more videos until my Reel is done, so cross your fingers for me!

Thursday, February 19, 2009

OliveMan's Special Idle

Here is a new animation of OliveMan! This is supposed to be an idle that shows a little about his personality. Any comments relevant to this (or any other) animation are appreciated :)

Enjoy!


OliveMan - Special Idle from Isai Calderon on Vimeo.

Thursday, February 5, 2009

Run, OliveMan, Run!

The run cycle. I think it came out ok. Any comments/suggestions/constructive critisizm, please post it. Enjoy! :)


Thursday, January 29, 2009

OliveMan: Returns

The walk cycle. I was still working on the idea of how OliveMan should actually walk/run/move in any way. I wanted to make it more cartoony, and less "realistic". Meaning, if a bunch of olives, toothpicks, and white gloves got together and made a character in real life, this is how the character would walk... Hypothetically, of course.  This is what I originally created:


And now, I give you the cartoon walk cycle. A teacher of mine sat with me to show me how to make the basic cartoon walk cycle.  Then, of course, I made my own with OliveMan. Like always, constructive criticism is welcome. Enjoy!


OliveMan: Toony Walk from Isai Calderon on Vimeo.

Friday, January 23, 2009

First OliveMan Video


This is the very first animation that I'm uploading of my character OliveMan. Unfortunately, he has been put on hold for a very long time, but now I am starting up on his animations. The texturing work is not final, but it is in place for visual aesthetics. More motion to come VERY soon. Seriously.
Enjoy!
First OliveMan Video from Isai Calderon on Vimeo.

Thursday, October 16, 2008

Double Kick 360

Here it is: my personal challenge for the week. The same biped jumping, double kick with a 360, land roll, and kip-up. This was fun. Lots. Seriously. It was a good challenge for me. I really had to concentrate on the weight of the legs and feet. The roll proved to be the most difficult part. I kept adjusting the animation here and there, but it kept wobbling on itself, so i deleted all the keys, rotated the Main biped bone, and it was completely fixed. Sometimes you have to go back to basics. The animation is a bit fast, so I'm going to cut the speed in half, render it, and post it again, fixed. Enjoy!

Thursday, October 9, 2008

Simple Walk

Here is an animation I made in 30 minutes. It's a simple bipedal animation done with 3DS Max 2009's Biped Rig. I just hid the upper body, and began animating the walk cycle. This is a simple test of my skill as an animator; the first of many. I hope you enjoy it!

Monday, September 15, 2008

Almost done (WIP)

Ladies and gentlemen, here is a video of the same Grimm Reaper, with all the animations almost done :D
Any ideas/comments, please put them up so that I can make it prettier.
I'm sorry for not posting anything up for a while. The skinning of the character was acting up in some of the movements, and syncing the Scythe together with both hands was giving me troubles, but i figured it all out. I hope you all like what I have so far.

Next up, the Vampire :) Skinning is done. I will post a video up of him once I have something to show. Enjoy!


Thursday, August 28, 2008

First WIP for class

Although this isn't my first animation, it's the first one I put in here that's an actual Work in Progress. It's for a Mod we're working on for the Unreal 2004 Engine. This is the first character I created. The Grimm Reaper. In this animation "set" I have him in his Idle and Walk cycles. I will be working on him during the weekend. Hit the comments for some suggestions/constructive criticism.

Enjoy ;)


P.S. The character is not yet textured. If anyone wants me to re-render it with a clearer solid-color texture, please let me know :)

P.P.S. The mesh was created by Ben Wheeler. All the meshes I will be rigging and animating were created by Ben. His web-site is right here.

New concept!!!

Eric Valdes is helping out with some of the concept for the characters in my short film. His site is here (Eric Valdes). Hope you like what you see. The direct link to the picture is right here.

Tuesday, July 22, 2008

It Begins

Continuing the process of my short film, here are some of the first drawings of the storyboard being done by my friend and concept artist, Chad Baptist.


Monday, July 21, 2008

Ornithomptor

For this next project, our teacher made a device that flies around.  The entire object, including the lighting, was of his creation.  The assignment was to make the device (called an Ornithomptor, for whatever reason), pick up a ball, and move it from one peg to the other with style.  This is my result:


Watch Ornithomptor in Animation  |  View More Free Videos Online at Veoh.com

Olive-Man

This was my 2D final for last year's Introduction to 2D animation.  It is of a character I created called Olive-Man.  He will be the protagonist for my project (kinda).  Enjoy!

Sunday, July 20, 2008

Hello Everyone

My name is Isaí (for those of you who don't habla espaniol, Easy is good enough), and I am a 3D artist, striving to specialize in animation.  Right now, I am learning how to animate with 3DS Max 2008 and XSI 6.5.  Hopefully I can get my hands on 3DS 2009 to see if all the bugs got fixed, but, when it comes to Autodesk and their ability to include "useful" updates, dare to dream, as they say.

In this blog, I will be posting any and all interesting animations that I've done, giving full credit to those who have contributed, of course.

I welcome any and all suggestions and/or comments about any of my content.

In the following months, I will be working on a short film, to which I will be posting some screenshots of, and hopefully, the entire completed project.

Please enjoy the content you see here.

Isaí